When my 10-year-old daughter was asked to make a working model of a Simple Machine for school, we did what most parents do these days—we started searching online for ideas.
In many schools, children are introduced to the topic of Simple Machines and then asked to choose one type of simple machine – such as a pulley, lever, wheel and axle, inclined plane, wedge, or screw – to create a working model.
The problem?
Almost every idea we found online seemed to be the same. The classic well-and-pulley project appeared over and over again. We also liked some pedal-operated garbage can projects that demonstrated levers, but we had already made something similar for a Best Out of Waste competition just a month earlier.
We wanted something different.
Then I remembered a fortune wheel activity that I had made for two of my children’s birthday parties – a Pokémon Carnival Party and a Princess Carnival Party. The party versions were made using paper plates, a brad fastener, and were taped onto a wall for children to spin and win prizes.

Pokemon carnival game 5 – Spin the Wheel
That’s when the idea struck.
Why not turn that fun carnival game into a Wheel and Axle Simple Machine project?
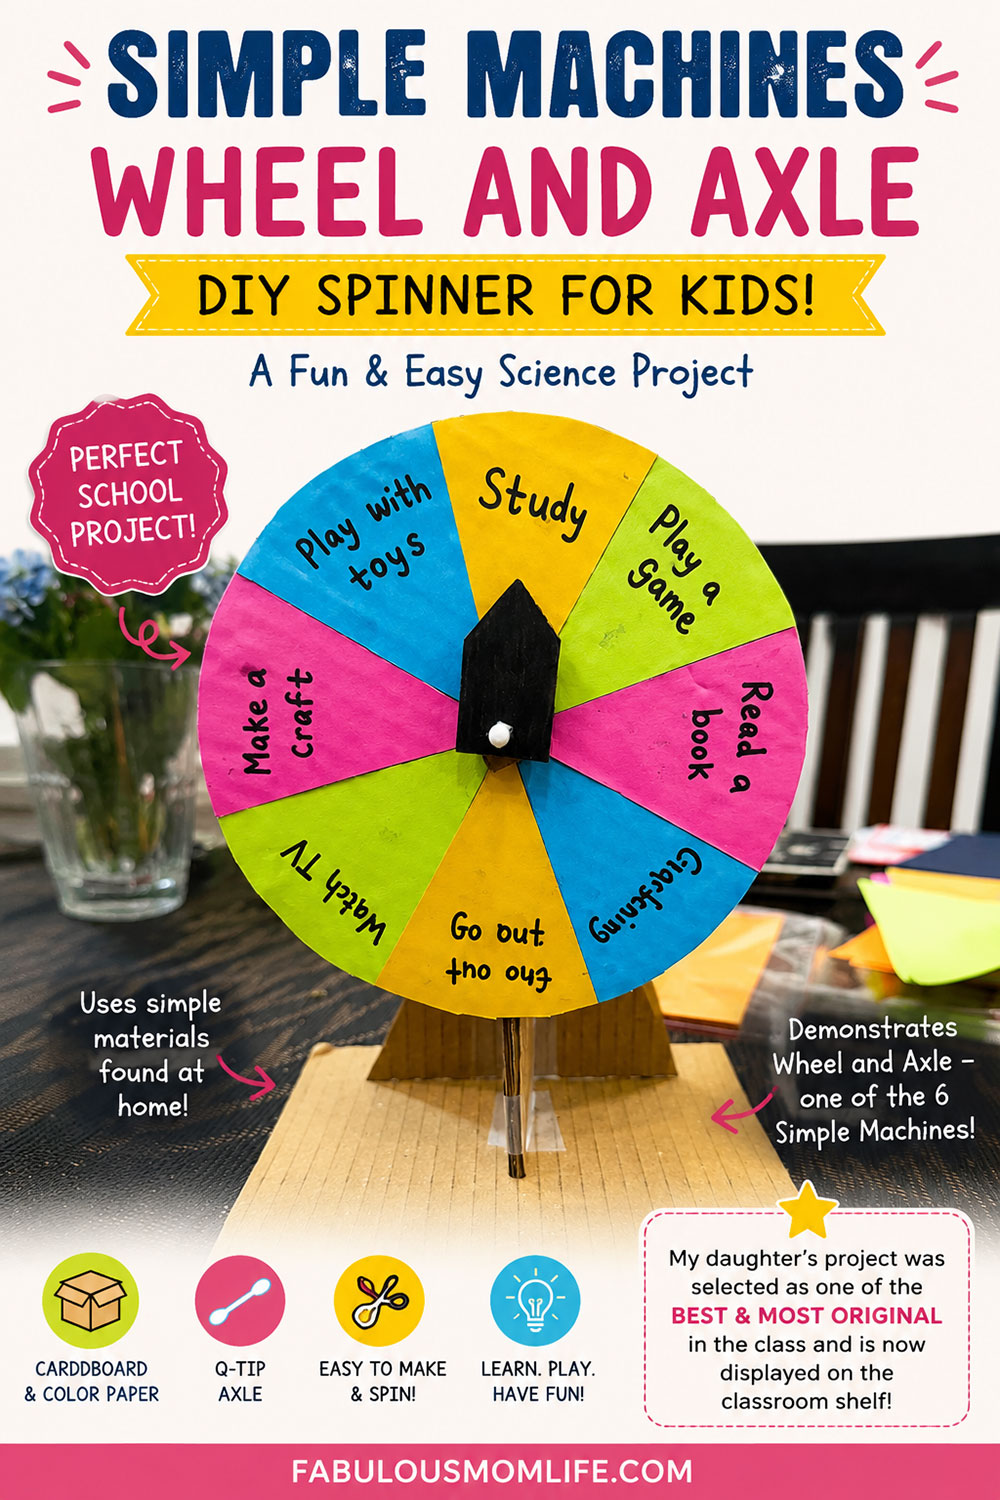
And to make it even more interesting, we decided to add a fun twist—rather than creating an ordinary spinner, we made a colorful “What Should I Do?” wheel filled with activities chosen by my daughter herself.
The finished project not only demonstrated a Simple Machine perfectly, but it was also one of the most unique projects in her class. In fact, her teacher selected it as one of the best and most original projects, and it is now displayed on the classroom shelf (Mommy flex :))
How Does This Demonstrate a Simple Machine?
This project demonstrates a Wheel and Axle, which is one of the six Simple Machines.
The six Simple Machines are:
- Lever
- Pulley
- Wheel and Axle
- Inclined Plane
- Wedge
- Screw
A Wheel and Axle consists of a large wheel attached to a smaller axle. When the wheel rotates, the axle rotates with it.
In our project:
- The cardboard circle acts as the wheel.
- The cotton swab (Q-tip) acts as the axle.
- The wheel spins around the axle.
- A fixed arrow points to the selected activity when the wheel stops.
This simple setup clearly demonstrates the concept of rotational movement and how a wheel and axle work together.
Materials We Used
One of the things I love most about this project is that almost everything came from around the house.
We used:
- Corrugated cardboard from old packaging boxes
- Colored craft paper
- Scissors
- Glue
- Marker pen
- Geometry divider
- Cotton swab (Q-tip)
- Clear/Scotch tape
- A small steel plate to trace the circle
Step 1: Make the Wheel
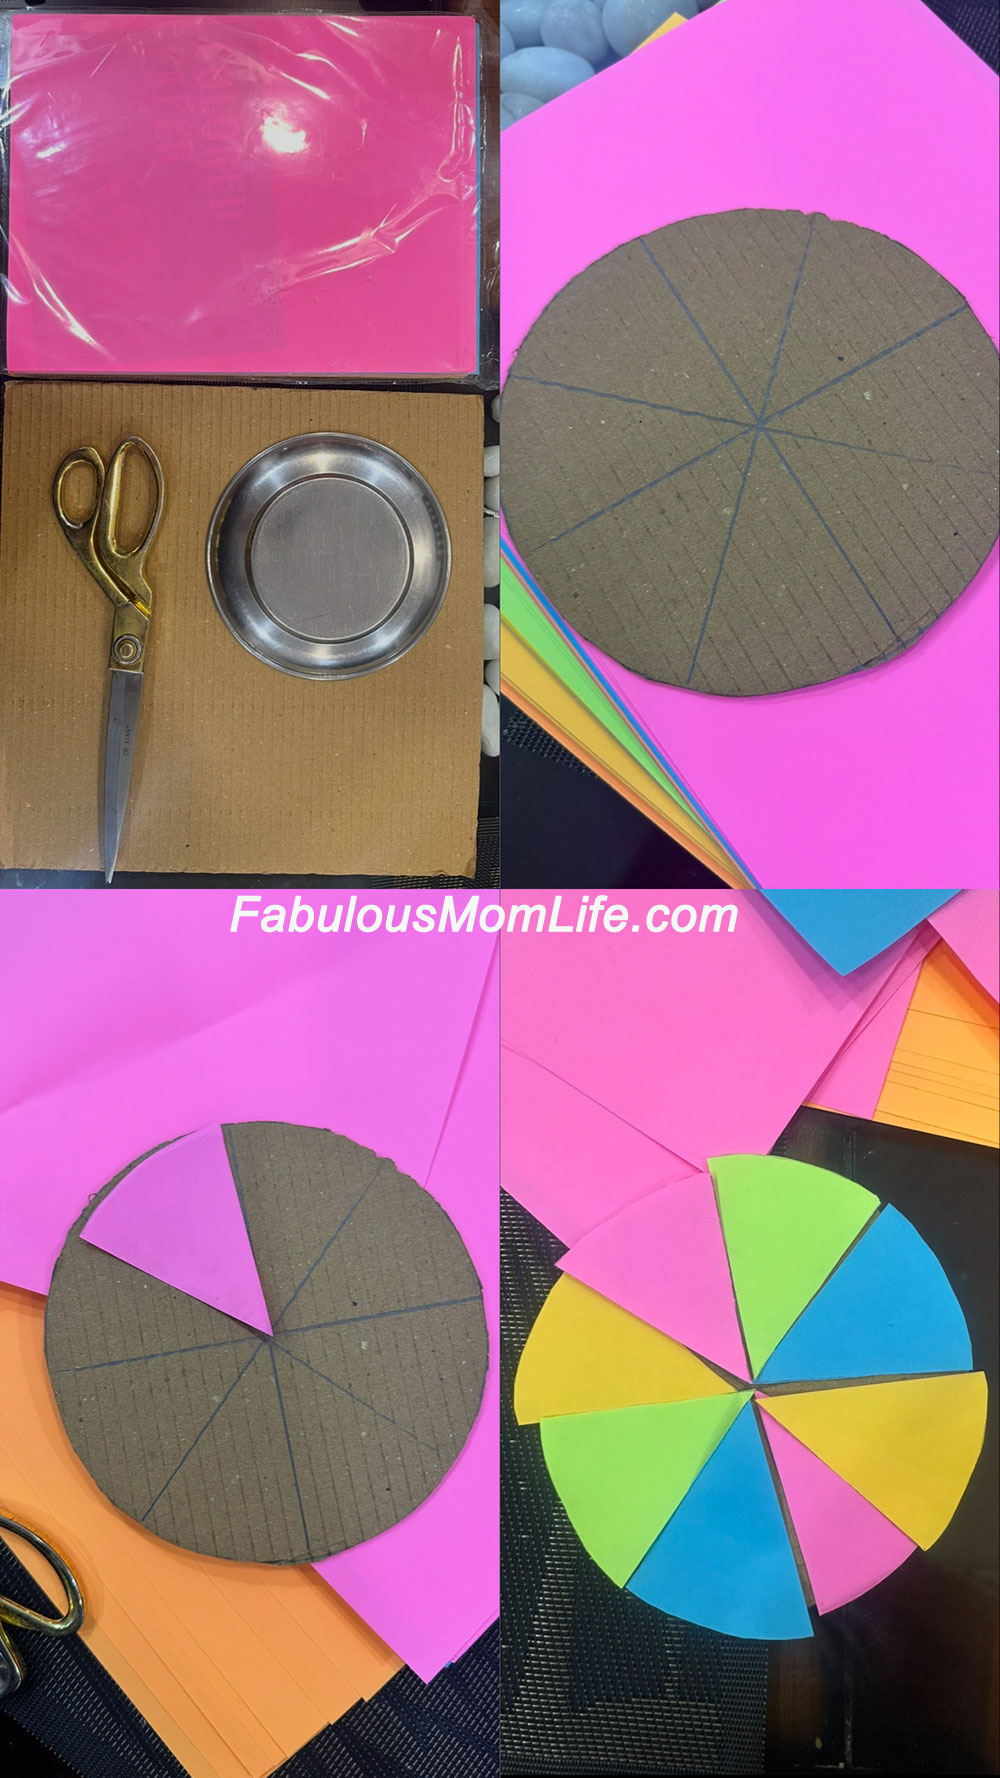
We began by tracing a circle onto cardboard using a small steel plate.
After cutting it out, we divided the circle into equal sections using a ruler.
This was where my daughter took over.
She selected all the colored papers, cut the sections herself, and glued them onto the wheel.
She also came up with all the activities that would go onto the spinner, including:
- Study
- Read a Book
- Play a Game
- Play with Toys
- Crafting
- Watch TV
- Go Out and Play
I think this ended up being her favorite part of the entire project because she got to personalize it completely.
Step 2: Create the Center Hole
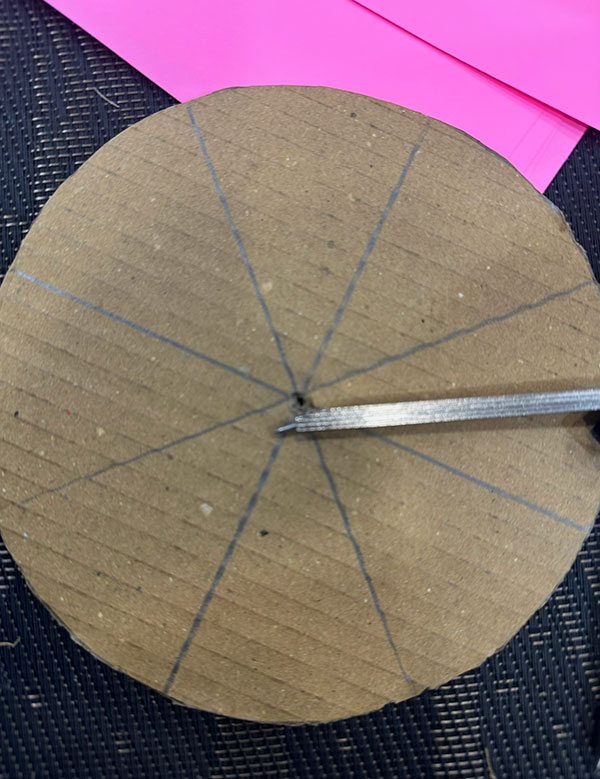
Using a geometry divider to make the axle hole in a Wheel and Axle Simple Machine project
Once the wheel was finished, we needed a way to attach it to an axle.
Using a geometry divider, we carefully poked a hole through the center of the cardboard circle.
The hole only needed to be large enough for the cotton swab to pass through.
Step 3: Build the Stand
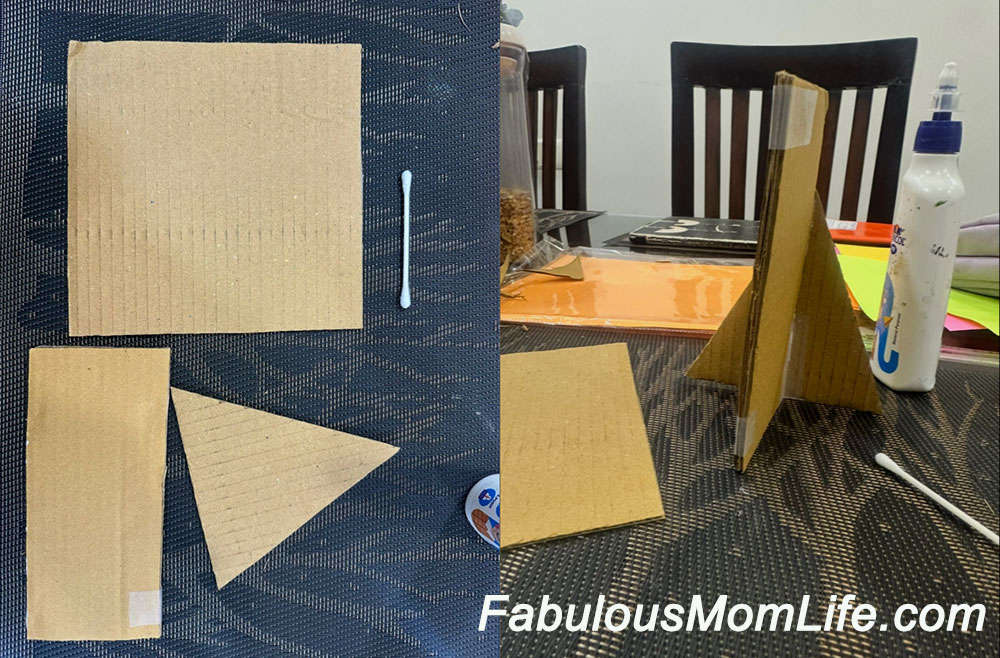
DIY cardboard support structure for a Wheel and Axle science fair project
For the stand, we kept things very simple.
We cut:
- One square cardboard base
- One vertical rectangular support
- One triangular support piece
The triangular piece was glued onto either side of the vertical support to help it stand upright. And the entire stand was glued to the square base. We also used scotch tape to hold the pieces together until the glue dried completely.
It wasn’t fancy, but it was sturdy – and that’s exactly what we needed.
Step 4: Make the Arrow Pointer
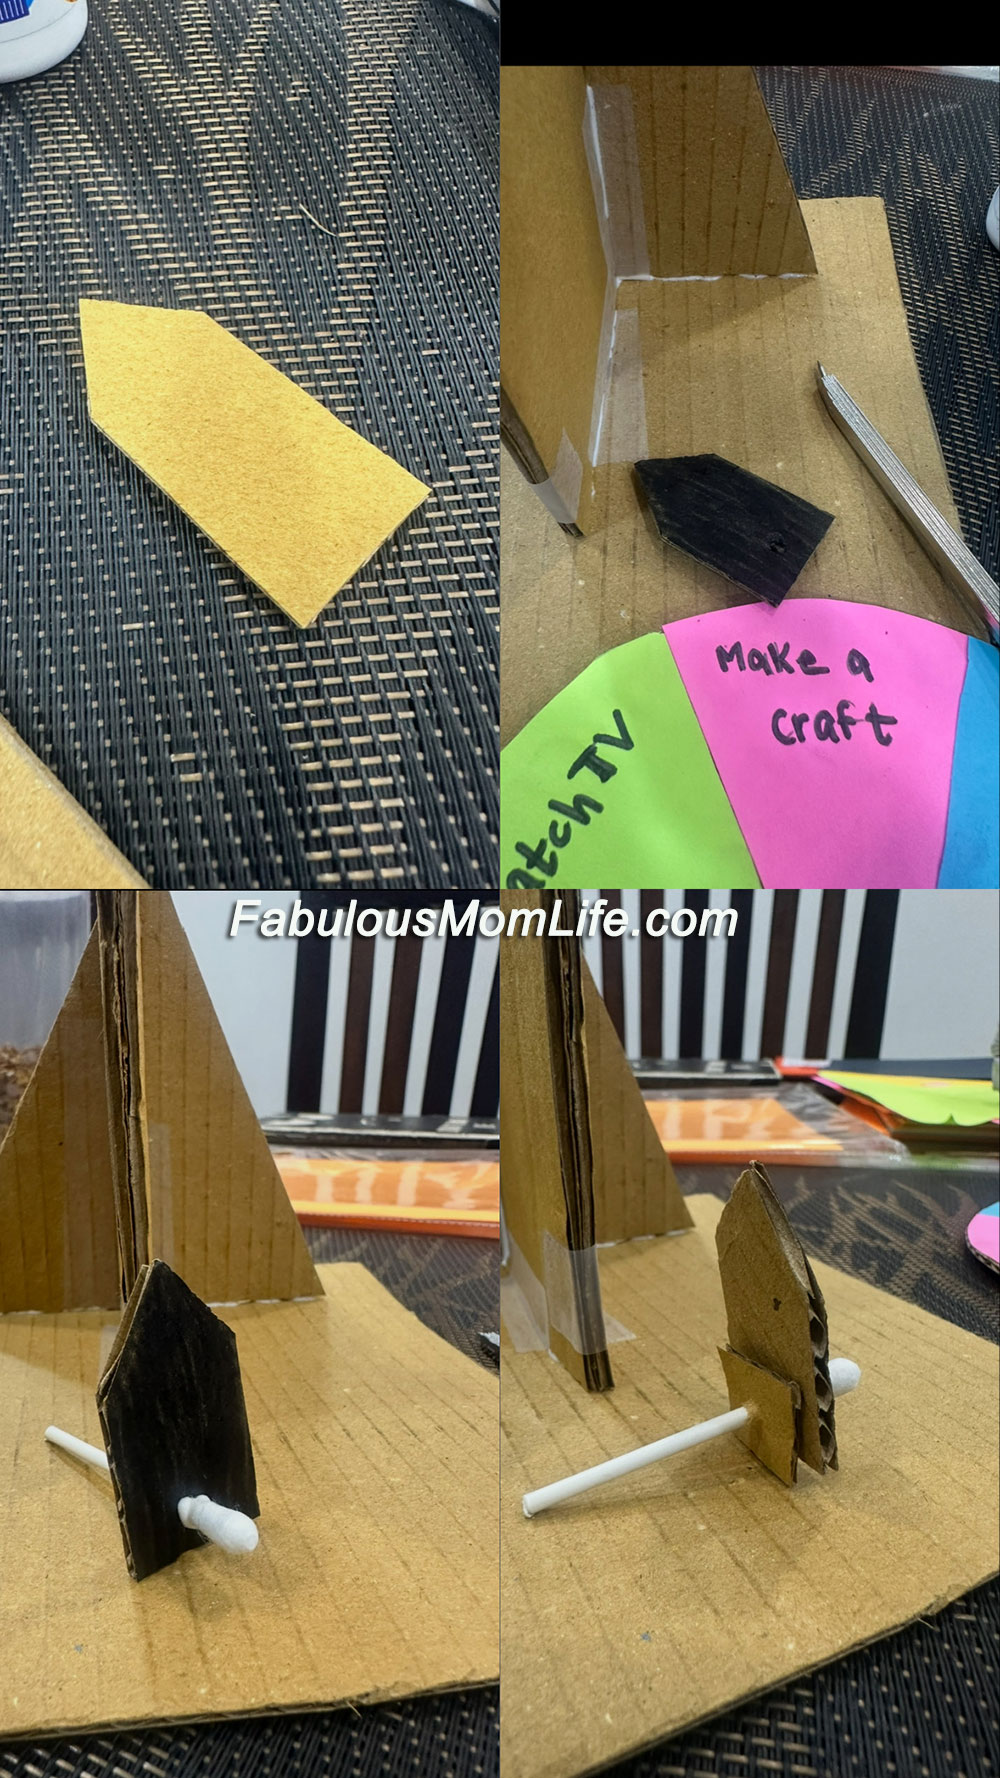
Making the pointer arrow
Next, we made the arrow that would indicate which activity the wheel landed on.
We cut a simple arrow shape from cardboard and painted it black.
Then came the part that involved the most experimenting.
For our birthday party fortune wheels, we had used paper plates with a brad fastener in the center. Since the wheels were lightweight and attached to a wall, that system worked perfectly.
This project was different.
The cardboard wheel was much heavier, and the brad wasn’t giving us the movement we wanted.
We first tried using a toothpick as the axle.
That failed almost immediately because it was simply too thin.
So we started looking around the house for alternatives.
After trying a few possibilities, we picked up a cotton swab and realized it was the perfect size.
![]()
The cotton swab was inserted through the black arrow, but we found that the arrow would also spin along with the wheel and you do not want that to happen!
Easy solution – we added a tiny drop of glue where the cotton swab met the arrow. This ensured that the arrow would remain fixed and wouldn’t rotate when the wheel was spun.
Step 5: Assemble the Project
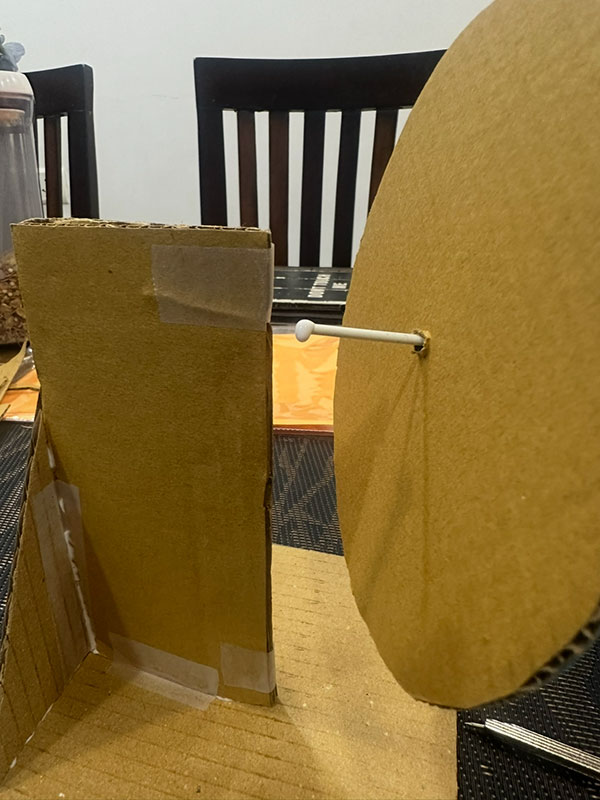
Final Assembly –
With all the individual pieces ready, it was time to put everything together.
The cotton swab axle was inserted through:
- The black arrow
- The center hole of the wheel
- The vertical cardboard support
The spaces in the corrugated cardboard are perfect for inserting a long object like our Q-tip. A drop of PVA glue ensured our axle would remain strongly put. The wheel sat in front of the stand while the arrow remained fixed in place.
After a little adjusting, the wheel spun smoothly while the arrow stayed perfectly still.
Exactly what we wanted.
Step 6: Give It a Spin
Now came the fun part.
We gave the wheel a spin and waited to see where it would stop.
The arrow pointed to one of the activities, instantly turning a science project into a game.
Honestly, once the project was finished, my daughter probably spent more time spinning it than presenting it.
Why This Is a Great Simple Machines Project
What I like most about this project is that it combines science, creativity, and play.
It clearly demonstrates the Wheel and Axle Simple Machine concept while also being interactive and fun.
Unlike many school projects that are displayed once and forgotten, this one can actually be used afterward.
Children can continue spinning it to choose activities, making it both a science model and a toy.
It also uses inexpensive materials that most families already have at home.
Final Thoughts
This ended up being one of my favorite school projects we’ve worked on together.
Instead of building another version of the well-and-pulley model that appears everywhere online, we created something unique, colorful, and genuinely enjoyable to use.
My daughter got to contribute her own ideas, choose the activities, cut the colorful sections, and watch the project come together from simple household materials.
The best part was seeing her proudly explain how the wheel rotates around the axle and how that makes it a Wheel and Axle Simple Machine.
And as a wonderful bonus, her project was selected as one of the best and most original projects in the class and now has a place on the classroom display shelf.
Not bad for a project made from cardboard scraps, colored paper, and a cotton swab.
Leave a Reply